Wednesday, April 25, 2012

WOYWW #151

What's on your workdesk? Wednesday...stop by there and check other desks! And I have something new to show you this week. My sewing cabinet! It's in the living room, it totally outgrew my craft room. First I'll show you pictures of the inside and then how it looks when its closed/curtained off. And, just so you know, its not very messy because I haven't had a chance to sew for a few weeks now, except for that 15 foot long, 7 foot wide, tablecloth I sewed a few weeks back for our fancy dinner that I still haven't posted pictures of. Sorry 'bout that. :)
 The first 2 pics are basically the same, just different lighting.

 Here the shelf with the sewing machine on it is rolled out. I installed that shelf! Girls with tools...
Here is a close-up of how I re-organized my threads in my apothecary jars, the ones I made.

This is the view of my sewing cabinet most of the time. Anyways, thanks for stopping by! Sometime I may have actual pictures of some sewing projects... ;-)

Wednesday, April 18, 2012

What's on your workdesk? Wednesday #150

Hello lovely bloggers and browsers! Here are a few pictures of my work(craft) desk this 
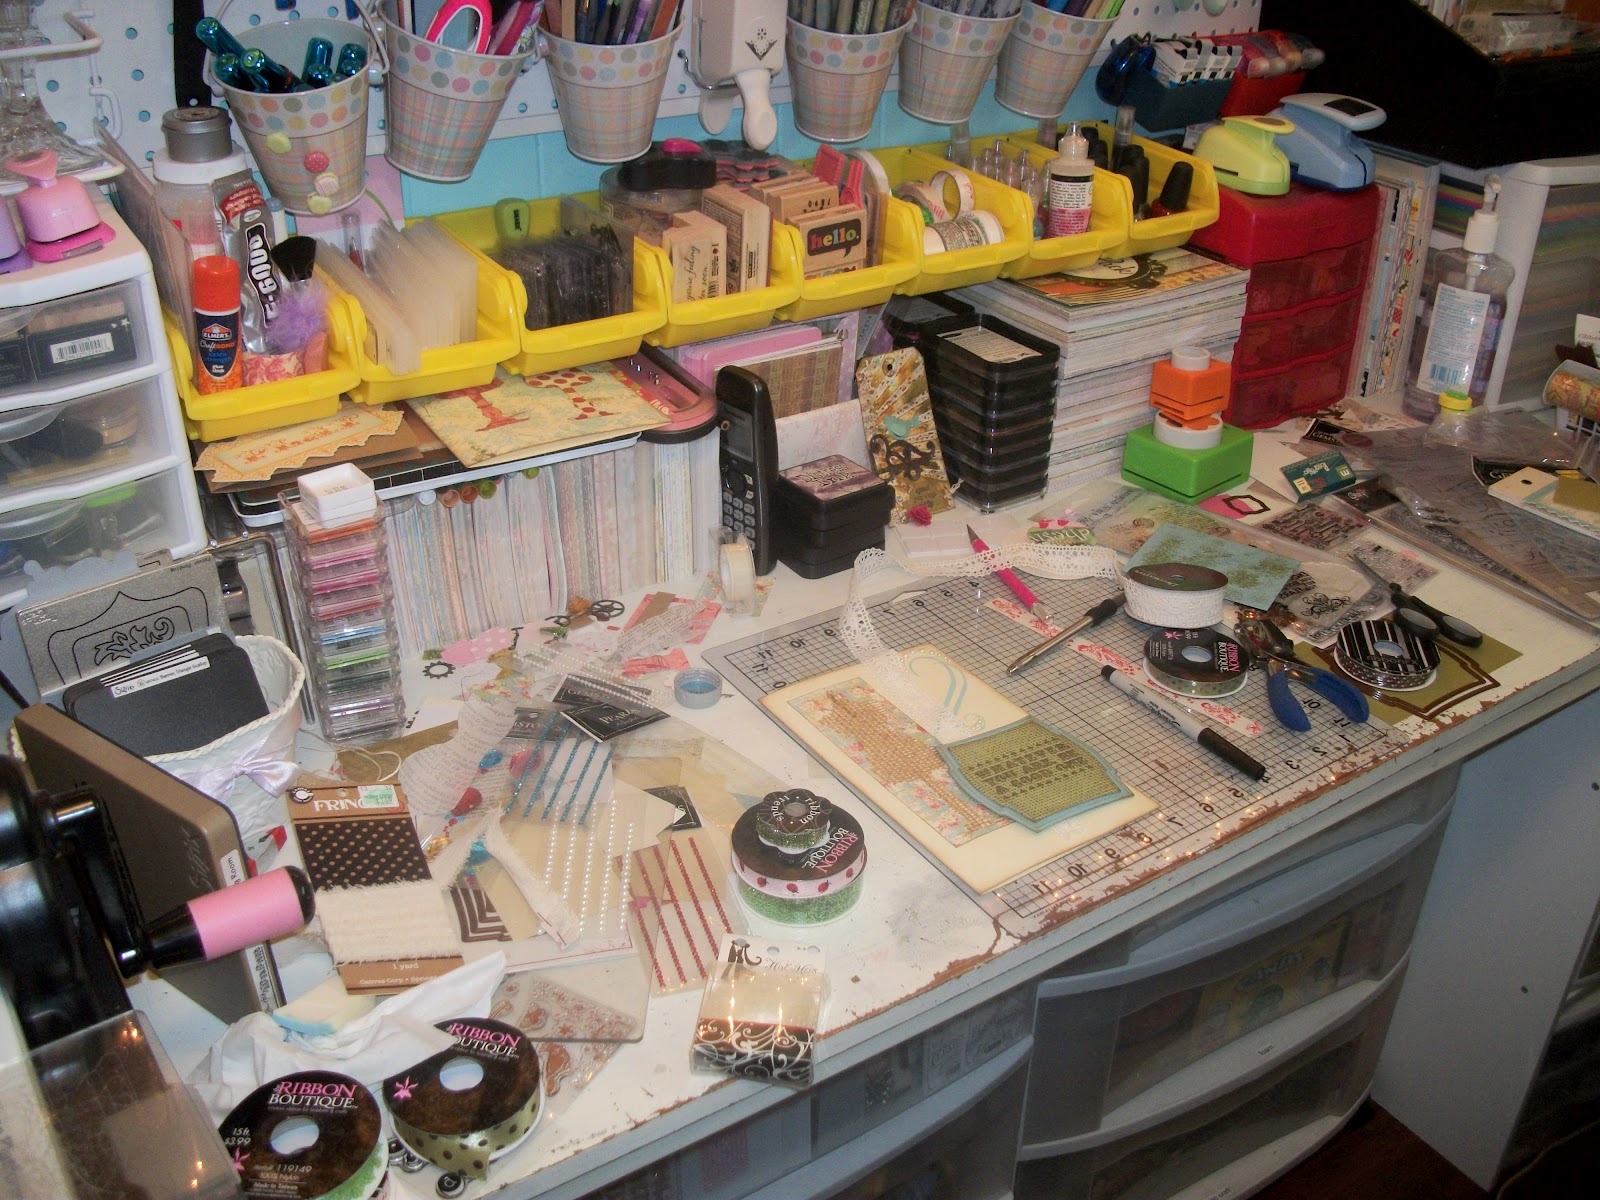
Wednesday, I should say they are from very early in the day...2:00 a.m. early! If I hadn't taken them then I probably wouldn't have gotten around to it today, it's shaping up to be pretty busy already. Here is my desk:
 Here is one of the cards I made, with the mess from above...
Honestly the gray in the swirl on the paper matches my added embellishments much better than the picture shows. When I have time I'm going to finally use that light box I made and take some good pictures! :-)
Next is a close-up of the left side of my paper desk. I thought you might enjoy seeing the details a little closer. I have one of those metal shelves that stands on your desk there, so that when I'm using my Big Shot the stuff can shoot out the back of the Big Shot and not run into anything, hence the left side under that shelf is only stacked with stuff a few inches tall. On the right side under that shelf you can see my short stack of big dies. On the back ledge of my Big Shot is a pretty container holding my thinner dies. It just gets moved around and dug through quite often so it doesn't have its own home. So sad. ;-) On the metal shelf is a white bin holding some 3-d embellishments, then you can see a super fabulous roll of greenish toile ribbon peeking out and before we reach the yellow bins there is a little 3 drawer organizer holding my $.97 alphabet sets, hole punchers and perfect pearls, and a few pairs of extra scissors and cutting tools.
 Proceeding in a rightwards directions we have my 4.5x6.5 paper stacks lined up with pens and a few glimmer mists style spritzers on top. Its still pretty easy to get the paper without disrupting the pens, especially when I put the prismacolor watercolor pencils in their case back under the pens! Meh. The yellow bins are on a rail so they float above everything that sits directly on my desktop, making it easier to get that stuff without having to move a whole pile to get to the stuff on the bottom like...see? :-)
The yellow bins hold, from left to right, liquid adhesives, small/edge embossing folders, small clear stamps, wooden stamps, wooden stamps, tape style adhesives, glitter glues and super handy Glossy Accents, and the last bin has glitter nail polish from the $Dollar Tree and a few random tubes of glitter glue. Underneath the yellow bins is a pull-out box with my 6x6 pads and then my ink pads from Hobby Lobby stacked neatly (I use them like this, does anyone else?) and them my 8x8 paper stacks are actually stacked. I should turn them on their side but I don't think there is 8" under there so they have to stay stacked. 
Here is the other card I made earlier this week, for my mom. She and her husband just purchased their first brick and mortar home ever. I embossed the cardstock with a swiss dots folder and then swiped my ink pad over them to make them pop out. A line of ribbon on the end where the folder didn't reach for embossing covers it and looks nice, right? :) Then a felt house sticker from a pack and wah-la!
I was going to put "congratulations" on the front but my dear mom likes to display my cards for like ever and I thought that would really date the card so I just left it with the house.
Anyways, hope you enjoyed a peek at my desk and projects so far this week...here is a sneak peak at my major project this week...
Yes, I have a really big research paper due! Hope you all have a lovely week and that I get to see some of your desks, too...see the amazing Julia if you don't have a clue what I'm talking about. :-)

Monday, April 16, 2012

It's Monday, right?

Since I've started the Wednesday craft desk thing I've had a hard time getting anything else posted so I'm thinking about giving the WOYWW its own page. Any thoughts? Well, otherwise, it's just that kind of day...
The kind of day where you feel the need to pat your own self on the back...I messed up turning in an 81 page portfolio last night by like 5 seconds too late and I'm still waiting to hear from the instructor if she will still accept it or not...pins and needles, I tell ya. But, on a positive note, I did get my last set of taxes done! And, for those who don't follow me on twitter, I just had one tweet for that: "TurboTax uses word verification to make sure I'm a human before I can file my taxes. How many computers or robots file taxes?!?" I mean, really? It's kind of ridiculous when you think about it, huh? Well, hope everyone else is having a wonderful day so far!

Wednesday, April 11, 2012

It's WOYWW Time! #149

So here are pictures of my paper crafting desk because it's What's on your workdesk? Wednesday again.
General view of my desk while I was working on the first card, you see in the next pic, and some other tags that aren't pictured, but one that is...
Here is the one card, not finished though...I want something down the middle...thinking I like the crocheted ribbon but I'm not married to it yet...
 Here is the tag I made after popping over to Tim Holtz's blog and receiving his inspiration...I don't think its done yet, either...I need more practice with his techniques...
 Next is the card I was working on this evening and...
 Managed to make my desk even messier!
But I changed up the ribbon rod, right above my paper desk...I have this great roll of burlap and hempy like twine that I managed to get up there and now I think I'll use them more, plus I like how they look. And you get a bonus side peek at my shelves of fabrics that I didn't have room for in the living room sewing cabinet. Yah. I haven't even shown y'all pictures of that yet! Maybe next week...
Until then have a good one and if you're curious what other desks look like make sure you pop by the Stamping Ground and check 'em out!

Wednesday, April 4, 2012

WOYWW # 148

It's that time again y'all! I have uploaded lots more pictures with a little commentary so on with the fun we go. The gracious Julia Dunnit over at Stamping Ground hosts this linky party...if you want to join or see lots more crafty spaces check it out here. Without further ado, here is what is on my desks this Wednesday evening:
 My paper crafting side first. I went ahead and took a wide angle shot so you could see whats on my right side as I craft from there in the center of my desk. Its just paper. Lots of paper!

 This is what I'm actually working on...18 handmade place cards for a big to-do this Friday! ;-) I'm giving away my theme a little early by posting this but I trust y'all not to spoil the surprise...
 Now on to my jewelry/bow side where I haven't done much but make a mess this last week or so...
 Actually I think since I last participated in WOYWW a few weeks ago that pink basket in the far upper right corner is one of my newest organization tools...the ribbon just fits better in it than it did in the other basket, which was oval shaped and this one is squared off. Next is a bit more of a wide angle shot of this side of my craft cave...so you can see my shelves of jewelry making stuff and ribbons and do-dads.
 These are my new buttons that I found on my short trip last week. Got them for a super deal and they came already organized for me! Can't beat that combo, right? I stuck them on the jewelry/bow desk even though I suspect I'll use them more on the paper desk.
 Here is one of the bows I finished sometime in the last week or so, I can't remember when.
 That one is going to one little girl and the next one is going to her sister, in the little basket it's in. And honestly its cuter than the picture shows...the colors are brighter, cheerier, and so cute altogether.
 Next are my other new little bits of organization...I think I got the idea from a magazine, probably the last special edition from Cardmaker magazine makers.
 I put A spare bar 4 room to grow, but I should have said 2 spare bars for doubly more room to grow! This worked really well for this size of ribbon. I just threaded the spools onto rods I removed from skirt/pant hangers. I also had to take the clothespin part(the part that would hold the skirt of pants) apart to get to the metal rods and so I used half of the pin on each end of the rod to make the rod hang down low enough for the ribbon to have room, so it didn't stick out. Next organizer is a 4 pair of pants hanger, where the rods swing out and then sit in those little  metal holders you see in the right side of the picture. It fit my littlest spools of ribbon just perfectly. I had a few duplicates left over and put them back in the glass jar they all had been overflowing from so I still have a decorative container sitting around with colorful ribbon in.
Back to the paper side these are the apothecary jars I like to create and I have filled them with cotton balls, ribbon, prima flowers, and ribbon bows/flowers.
Functional and beautiful!
Hopefully just like all of us. ;-)
Thanks for stopping by!